# Public Evaluation Platform User Guide
We have built an AWS-based platform for large-scale parallel evaluation of OSWorld tasks.
The system follows a Host-Client architecture:
- **Host Instance**: The central controller that stores code, configurations, and manages task execution.
- **Client Instances**: Worker nodes automatically launched to perform tasks in parallel.
The architecture consists of a host machine (where you git clone and set up the OSWorld host environment) that controls multiple virtual machines for testing and potential training purposes.
Each virtual machine serves as an OSWorld client environment using pre-configured AMI images and runs `osworld.service` to execute actions and commands from the host machine.
To prevent security breaches, proper security groups and subnets must be configured for both the host and virtual machines.
## 1. Platform Deployment & Connection
Below, we assume you have no prior AWS configuration experience.
You may freely skip or replace any graphical operations with API calls if you know how to do so.
### 1.1 Launch the Host Instance
Please create an instance in the AWS EC2 graphical interface to build the Host Machine.
Our recommended instance type settings are as follows: if you want to run fewer than 5 VM environments in parallel (`--num_envs` < 5), `t3.medium` will be sufficient; if you want to run fewer than 15 VM environments in parallel (`--num_envs` < 15), `t3.large` will be sufficient; however, if you want to use more than 15 VM environments in parallel, it's better to choose a machine with more vCPUs and memory, such as `c4.8xlarge`.
For the AMI, we recommend using Ubuntu Server 24.04 LTS (HVM), SSD Volume Type, though other options will also work since the host machine doesn't have strict requirements.
For storage space, please consider the number of experiments you plan to run.
We recommend at least 50GB or more.
For security group configuration, please configure according to your specific requirements.
We provides a monitor service that runs on port 8080 by default.
You need to open this port to use this functionality.
Set the VPC as default, and we will return to it later to configure the virtual machines with the same setting.
### 1.2 Connect to the Host Instance
#### Step 1: Prepare Your SSH Key
* When launching the instance, choose "Create new key pair" and download the `.pem` file (e.g. `osworld-host-key.pem`). Save it locally.

* Set appropriate permissions:
```bash
chmod 400
```
* Find your instance's **public IP** and **DNS**:
- Go to the EC2 **Instances** page on the AWS Console.
- Locate your Host instance by its ID.

* On the instance detail page:
- **Public IP/DNS**: used for browser/VNC access and SSH connection
- **Instance metadata**: e.g. storage, can be adjusted post-launch

#### Step 2: Connect via SSH or VSCode
* SSH:
```bash
ssh -i ubuntu@
```
* VSCode/Cursor Remote SSH configuration:
```
Host host_example
HostName
User ubuntu
IdentityFile
```
#### Step 3: Set up the host machine
After you connect the host machine, clone the latest OSWorld and set up the environment.
```
# Clone the OSWorld repository
git clone https://github.com/xlang-ai/OSWorld
# Change directory into the cloned repository
cd OSWorld
# Optional: Create a Conda environment for OSWorld
# conda create -n osworld python=3.9
# conda activate osworld
# Install required dependencies
pip install -r requirements.txt
```
Then it is almost done for the host machine part!
### 1.3 Set up the virtual machine
We need to programmatically scale virtual machines.
Therefore, we will use the graphical interface to configure and obtain the necessary environment variables, then set these environment variables on the host machine so that the OSWorld code can read them to automatically scale and run experiments.
For the client machine environments, we have already prepared pre-configured client machine environments in different regions, stored in https://github.com/xlang-ai/OSWorld/blob/main/desktop_env/providers/aws/manager.py:
```
IMAGE_ID_MAP = {
"us-east-1": {
(1920, 1080): "ami-0d23263edb96951d8"
},
"ap-east-1": {
(1920, 1080): "ami-0c092a5b8be4116f5"
}
}
# Tell us if you need more, we can make immigration from one place to another.
```
Therefore, you don't need to configure the virtual machine environments and related variables.
If you need to add additional functionality, you can configure it based on these images.
If you want to reconfigure from scratch, please refer to the files and instructions under https://github.com/xlang-ai/OSWorld/tree/main/desktop_env/server.
#### Step 1: Security Group for OSWorld Virtual Machines
OSWorld requires certain ports to be open, such as port 5000 for backend connections to OSWorld services, port 5910 for VNC visualization, port 9222 for Chrome control, etc.
The `AWS_SECURITY_GROUP_ID` variable represents the security group configuration for virtual machines serving as OSWorld environments.
Please complete the configuration and set this environment variable to the ID of the configured security group.
**⚠️ Important**: Please strictly follow the port settings below to prevent OSWorld tasks from failing due to connection issues:
##### Inbound Rules (8 rules required)
| Type | Protocol | Port Range | Source | Description |
|------|----------|------------|--------|-------------|
| SSH | TCP | 22 | 0.0.0.0/0 | SSH access |
| HTTP | TCP | 80 | 172.31.0.0/16 | HTTP traffic |
| Custom TCP | TCP | 5000 | 172.31.0.0/16 | OSWorld backend service |
| Custom TCP | TCP | 5910 | 0.0.0.0/0 | NoVNC visualization port |
| Custom TCP | TCP | 8006 | 172.31.0.0/16 | VNC service port |
| Custom TCP | TCP | 8080 | 172.31.0.0/16 | VLC service port |
| Custom TCP | TCP | 8081 | 172.31.0.0/16 | Additional service port |
| Custom TCP | TCP | 9222 | 172.31.0.0/16 | Chrome control port |
Once finished, record the `AWS_SECURITY_GROUP_ID` as you will need to set it as the environment variable `AWS_SECURITY_GROUP_ID` on the host machine before starting the client code.
##### Outbound Rules (1 rule required)
| Type | Protocol | Port Range | Destination | Description |
|------|----------|------------|-------------|-------------|
| All traffic | All | All | 0.0.0.0/0 | Allow all outbound traffic |
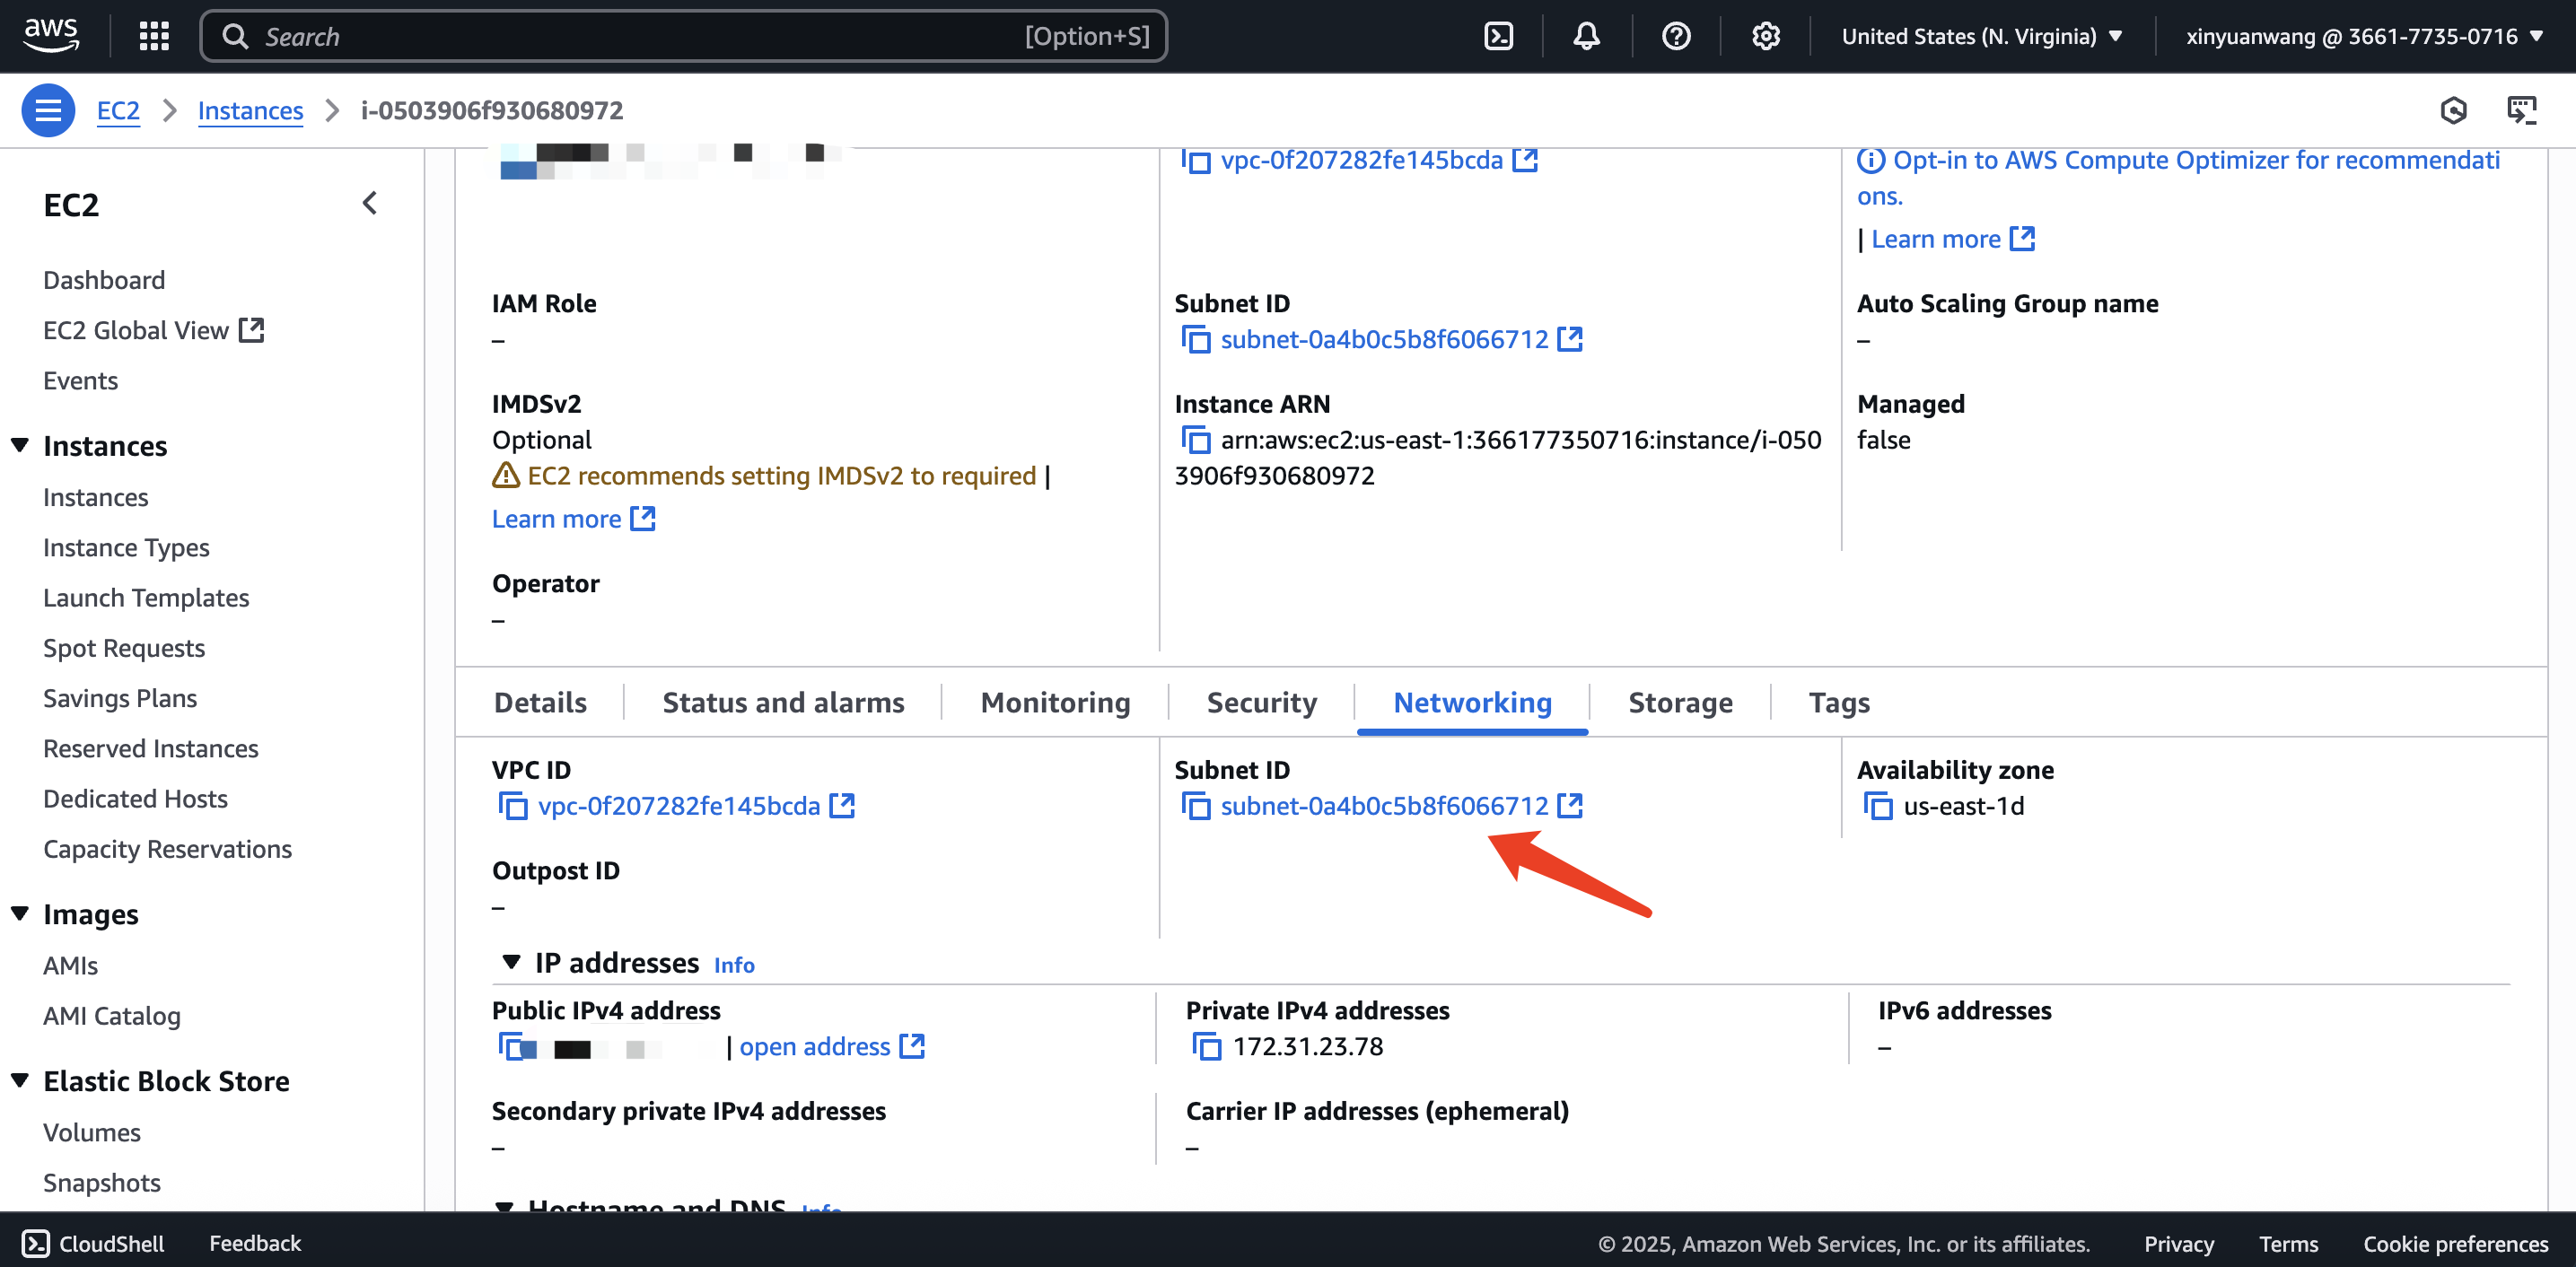
#### Step 2: Record VPC Configuration for Client Machines from Host Machine
To isolate the entire evaluation stack, we run both the host machine and all client virtual machines inside a dedicated VPC.
The setup is straightforward:
1. Launch the host instance in the EC2 console via the AWS console and note the **VPC ID** and **Subnet ID** shown in its network settings.
2. Record the **Subnet ID** as you will need to set it as the environment variable `AWS_SUBNET_ID` on the host machine before starting the client code.
### 1.3 Get AWS Access Keys & Secret Access Key
Click on **Security Credentials** from the drop-down menu under your account in the top-right corner.
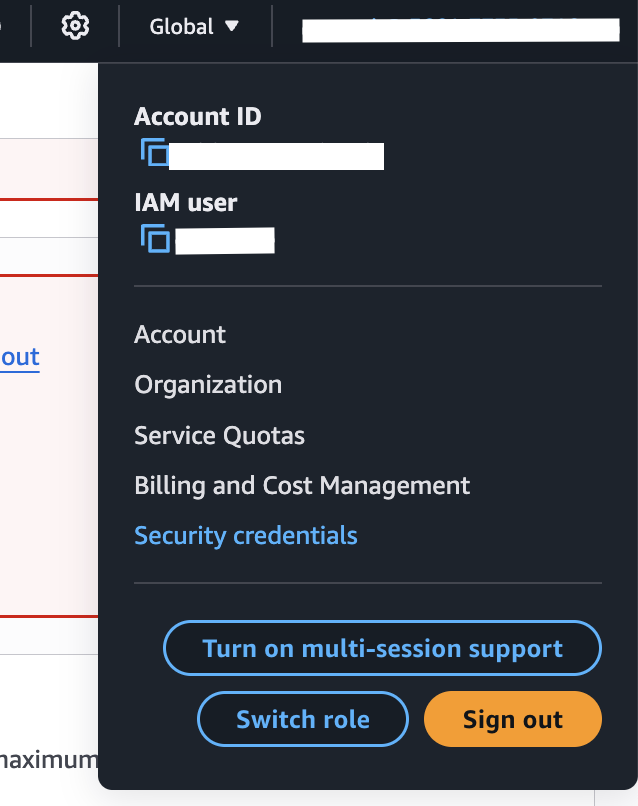
In the **Access keys** section, click **"Create access key"** to generate your own key.

Similarly, later you will need to set them as the environment variables on the host machine.
## 2. Environment Setup
Great! Now back to the **host machine**, we can start running experiments!
All the following operations are performed on the host machine environment, under the OSWorld path.
### 2.1 Google Drive Integration (Optional)
Follow the instructions in [ACCOUNT_GUIDELINE](./ACCOUNT_GUIDELINE.md), specifically the section "Generating `credentials.json` for Public Eval". This part is necessary if using public evaluation.
You can skip this step at the debugging stage, since it is only 8 Google Drive tasks and it is more and more annoying to make it due to their policy.

### 2.2 Proxy Setup
- Register at [DataImpulse](https://dataimpulse.com/).
- Purchase a US residential IP package (approximately $1 per 1GB).
- Configure your credentials in `OSWorld/evaluation_examples/settings/proxy/dataimpulse.json`:
```json
[
{
"host": "gw.dataimpulse.com",
"port": 823,
"username": "your_username",
"password": "your_password",
"protocol": "http",
"provider": "dataimpulse",
"type": "residential",
"country": "US",
"note": "Dataimpulse Residential Proxy"
}
]
```
We have set proxy to True in the config JSON files for those proxy-sensitive tasks. OSWorld will automatically wrap these tasks with a proxy when DesktopEnv's `enable_proxy=True`, while other tasks will not be affected.
We recommend using a proxy.
If you don't need it at all, please set `enable_proxy=False` in the experiment's `.py` file:
```
env = DesktopEnv(
...
enable_proxy=False,
...
)
```
(We didn't make too much explanantion on the DesktopEnv interface, please read theough the code to get to understand here.)
Note that disabling the proxy will cause some tasks under the Chrome domain to fail.
### 2.3 Set Environment Variables
```bash
# export OPENAI_API_KEY_CUA="your_openai_api_key" # if you use openai API
# export ANTHROPIC_API_KEY="your_anthropic_api_key" # if you use anthropic API
# export DASHSCOPE_API_KEY="your_dashscope_api_key" # if you use dashscope API from alibaba qwen
# export DOUBAO_API_KEY, DOUBAO_API_URL = "", "" # if you use doubao seed API from bytedance ui_tars
export AWS_ACCESS_KEY_ID="your_access_key" # key we mentioned before
export AWS_SECRET_ACCESS_KEY="your_security_access_key" # key we mentioned before
export AWS_REGION="your_aws_region" # eg. us-east-1, or leave it, it will be set default to us-east-1
export AWS_SECURITY_GROUP_ID="sg-xxxx" # the security group we mentioned before
export AWS_SUBNET_ID="subnet-xxxx" # the subnet we mentioned before
```
## 3. Running Evaluations
Use the `run_multienv_xxx.py` scripts to launch tasks in parallel.
Example (with the OpenAI CUA agent):
```bash
python run_multienv_openaicua.py \
--headless \
--observation_type screenshot \
--model computer-use-preview \
--result_dir ./results_all \
--test_all_meta_path evaluation_examples/test_all.json \
--region us-east-1 \
--max_steps 150 \
--num_envs 5
```
Key Parameters:
- `--num_envs`: Number of parallel environments
- `--max_steps`: Max steps per task
- `--result_dir`: Output directory for results
- `--test_all_meta_path`: Path to the test set metadata
- `--region`: AWS region
Usually the running code is named with `run_multi_env_xxx.py` under main folder, and the agent implementation is under `mm_agents` folder.
Add according to your needs.
## 4. Viewing Results
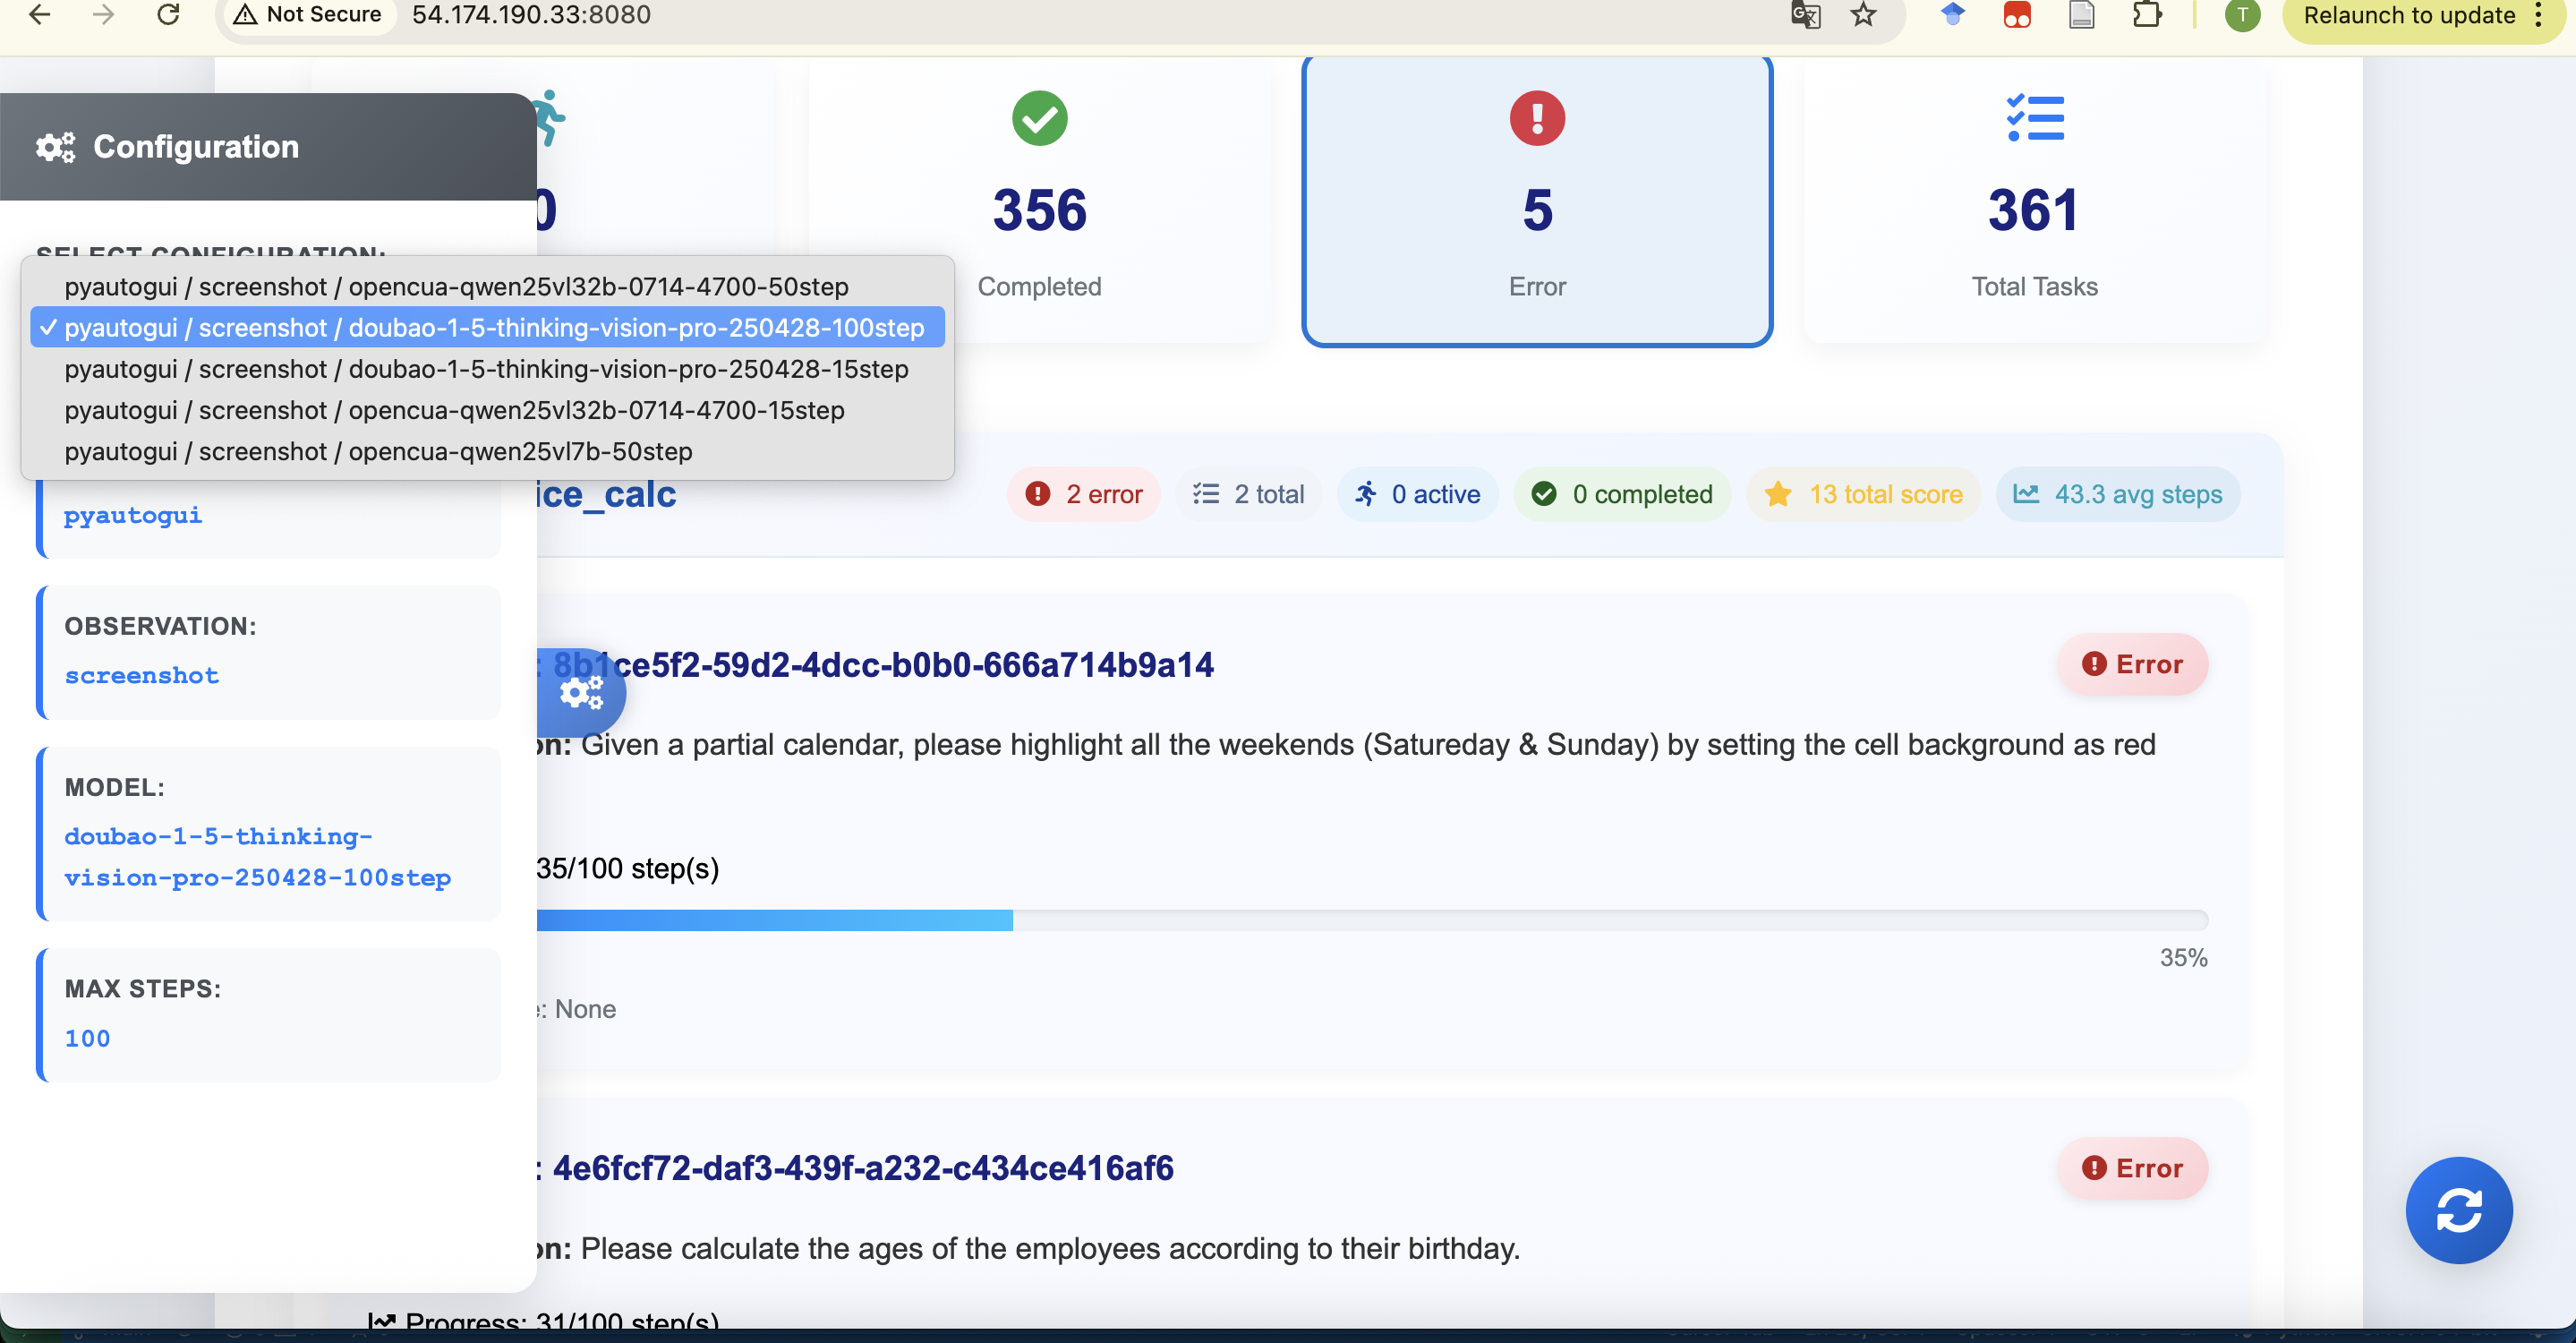
### 4.1 Web Monitoring Tool
```bash
cd monitor
pip install -r requirements.txt
python main.py
```
Then, open your Host's **public IP** on port `8080` in a browser. (eg. `http://:8080`)
For more, see: [MONITOR_README](./monitor/README.md)
### 4.2 VNC Remote Desktop Access
We pre-install vnc for every virtual machine so you can have a look on it during the running.
You can access via VNC at`http://:5910/vnc.html`
The password set default is `osworld-public-evaluation` to prevent attack.
## 5. Contact the team to update leaderboard and fix errors (optional)
If you want your results to be displayed on the leaderboard, please send a message to the OSWorld leaderboard maintainers (tianbaoxiexxx@gmail.com, yuanmengqi732@gmail.com) and open a pull request. We can update the results in the self-reported section.
If you want your results to be verified and displayed in the verified leaderboard section, we need you to schedule a meeting with us to run your agent code on our side to obtain results and have us report them. Alternatively, if you are from a trusted institution, you can share your monitor and trajectories with us.
If you discover new errors or the environment has undergone some changes, please contact us via GitHub issues or email.